

Kitchen technique · guide
Tying up meat and poultry
A few turns of cotton string turn a sprawling bird or a loose rolled joint into a neat parcel that roasts evenly, holds its stuffing and carves cleanly. Here is the quick truss, the full truss and the tied joint, step by step, with drawings.
- Step by step
- Chicken & turkey
- Rolled joints
- Cotton string only
Four good reasonsWhy tie meat and poultry?
- Even cookingA joint that is the same thickness from end to end cooks at the same rate all the way along, so thin flaps and loose ends do not dry out while the middle catches up.
- A neat shapeMeat tightens and shrinks in the heat, and an untied joint can curl or open up. String holds it round and compact, so it browns evenly and looks good on the board.
- Keeping the stuffing inTies keep a stuffed rolled joint closed and hold the neck skin of a bird in place. For a whole turkey, the Food Standards Agency advises cooking the stuffing in a separate tin instead.
- Easier carvingA firm, even roll gives round slices of the same size, and a bird with its legs held close sits steady on the board. See how to carve a turkey or chicken.
Poultry · the quick tieThe simple truss
The quickest tie and, for most roast chickens, all you need. One short length of string holds the drumstick ends together, and tucking the wing tips keeps them flat so they do not catch and burn.
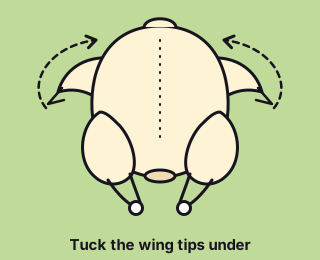 Tuck the wing tips
Pat the bird dry with kitchen paper (there is no need to wash it). Sit it breast up with the legs towards you, fold each wing tip back and push it under the shoulder, so the wing lies flat against the body.
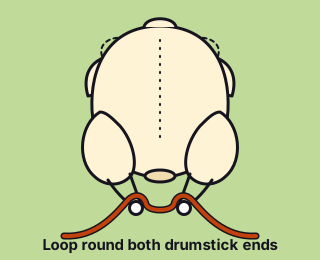 Loop the drumstick ends
Cut about 50 cm of cotton string (around 75 cm for a turkey). Pass the middle of it under both drumstick ends, just above the knobbly knuckles where the skin is tight, and wrap it round them once or twice.
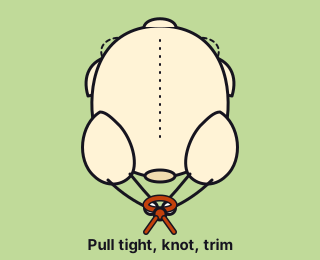 Pull together and knot
Pull both ends so the legs close neatly over the cavity, then tie a double knot and trim the ends short. If you have stuffed the neck end, fold the neck skin under the back first; a cocktail stick will hold it.
Poultry · one string, no needleThe full truss
The classic kitchen truss holds the legs, the sides and the wings with a single piece of string, giving a compact bird that keeps its shape through roasting and on the board. It takes a minute once you have done it a couple of times.
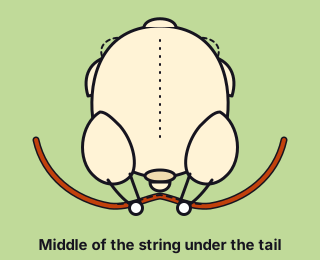 String under the tail
Cut about 1 m of string for a chicken (roughly twice that for a big turkey; spare string is easy to trim). With the wing tips tucked and the bird breast up, legs towards you, slide the middle of the string under the tail end so an end comes up on each side.
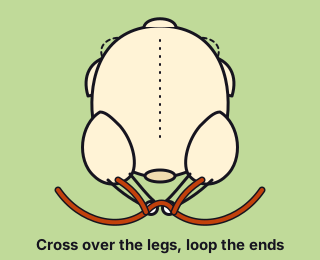 Cross over the legs
Bring the ends up and cross them over the drumsticks, then loop each one round the drumstick end on its side. Pull both ends: the legs draw together and close over the cavity.
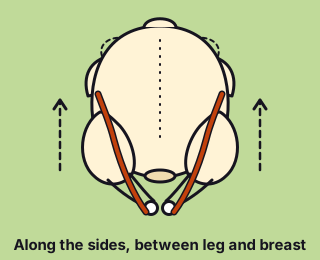 Along the sides
Take the two strings back towards the neck end, one on each side, running them along the groove between the thigh and the breast. Keep them taut so the legs sit snugly against the body.
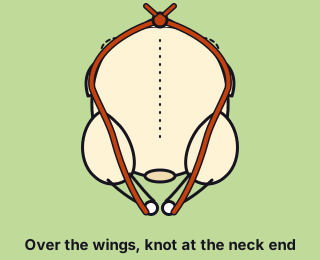
- Over the wings, knot at the neck
Carry each string over the wing on its side, holding the wing against the body, and pull both ends tight at the neck end. Turning the bird over makes this easier: tie a double knot over the neck flap and backbone, trim, and turn it breast up again.
The professional wayTrussing with a needle
Chefs often truss with a trussing needle, a long needle with a big eye threaded with kitchen string. The needle goes right through the bird, through the legs and body and then through the wings and neck skin, and the ends are tied off. The string holds the bird from the inside, so less of it sits on the skin. It needs a little practice, and the one-string method above does the same job at home.
Beef, pork, lambTying a rolled joint
Do you need to?When to tie a joint yourself
Rolled joints such as a boned loin of pork, a sirloin of beef, or a boned shoulder or leg of lamb usually come ready tied (or in elastic netting) from the butcher or supermarket, and that string stays on for cooking. Tie it yourself when:
- you have boned and rolled the joint at home;
- you have untied it to season it or add a stuffing;
- the shop’s ties have slipped, or are too far apart to hold it;
- a boneless piece is uneven in thickness and needs pulling into shape.
The knotThe butcher’s knot
A slip knot that you can pull tight against the meat with one hand and then lock, so the loop does not loosen while you tie it off. Our butcher’s knot page shows it with photographs.
Separate loops with a butcher’s knot
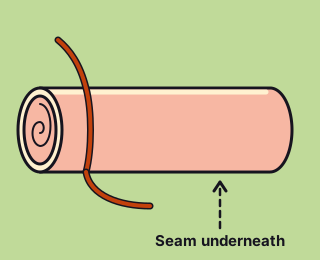 Roll and start at one end
Roll the meat firmly into an even cylinder with the fat or skin on the outside and the seam underneath, tucking in any thin flaps. Cut several lengths of string, each long enough to go round the joint twice. Slide the first under the joint about 2 cm from one end.
 Make the knot
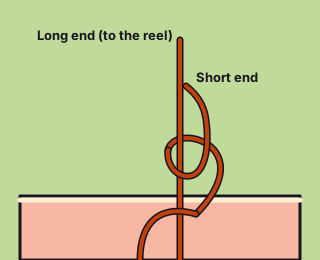
Bring both ends up over the top. Take the short end over the long end, round behind it and back through the loop you have just made.
 Pull tight and lock
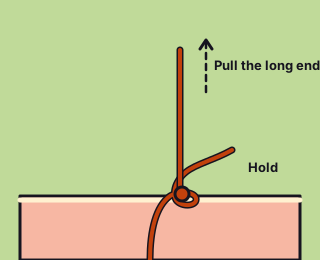
Hold the short end and pull the long end: the knot slides down and tightens round the meat. Make it snug, firm enough to hold the shape but not biting deep into the meat. Lock it with a second simple knot and trim both ends.
 Every 2–3 cm
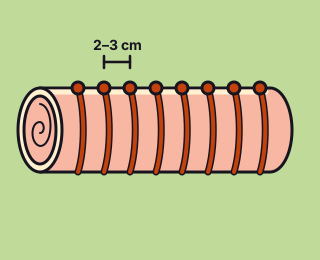
Repeat along the joint, spacing the loops evenly about 2–3 cm apart, with the knots in a line along the top. Even spacing and even tension give an even roll that cooks evenly.
The alternativeThe continuous-loop method
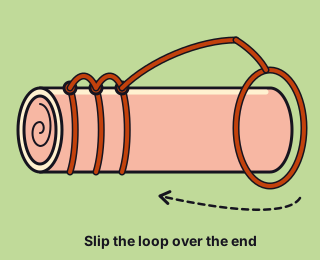
- Without cutting the string from the ball, tie it round one end of the joint with a butcher’s knot.
- Make a loop round your fingers, give it a twist, open it out and slip it over the far end of the joint.
- Slide the loop back until it sits 2–3 cm from the last tie, then pull the string to tighten it. Repeat to the end.
- Turn the joint over and take the string back along the underside, wrapping it once round each loop as you pass. Turn it the right way up and tie off against the first knot.
It is quicker once you have the knack and holds an odd-shaped joint, such as a boned shoulder, very securely. Practise on a rolled-up tea towel first.
Tying a stuffed rolled joint
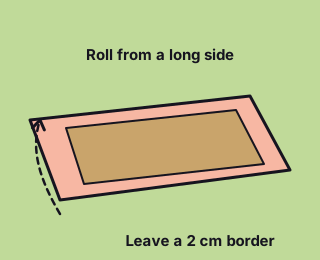 Spread and roll
Open the boned joint skin side down and season it. Spread the stuffing in an even, not too thick layer, leaving a border of about 2 cm so it does not squeeze out. Roll it up firmly from a long side and finish with the seam underneath.
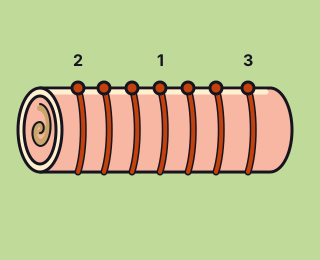 Middle, ends, then fill in
Tie the first loop round the middle, then one near each end, so the stuffing cannot be pushed out of the ends. Fill in between with loops 2–3 cm apart.
Cook it right through. Rolling carries anything on the surface of the meat into the middle, so the Food Standards Agency says rolled joints (and pork and poultry) should be cooked all the way through, not served pink. Check the centre of the stuffing with a probe: 70 °C for 2 minutes, or 75 °C for 30 seconds. A stuffed joint takes longer than the same weight unstuffed.
What to tie withString: what to use and how much
The right stringPlain cotton butcher’s twine
- Use plain, undyed, 100% cotton string, sold as butcher’s twine or kitchen string. It copes with oven heat and grips the meat as you tighten it. Linen kitchen twine works too.
- Avoid synthetic string such as polypropylene, polyester or nylon, which can melt; coloured or waxed string; and garden twine such as jute, which can scorch and shed fibres.
- Even cotton can char under a hot grill or over a flame, so keep string away from grill elements and open fire.
How much to cutLengths
- Simple truss: about 50 cm for a chicken, about 75 cm for a turkey.
- Full truss: about 1 m for a chicken, roughly double for a large turkey.
- Separate loops: each piece long enough to go round the joint twice.
- Continuous loop: work straight from the ball and cut when you have finished.
Too long is better than too short: trim the spare once the knot is tied.
Before carvingTaking the string off
Let the meat rest, then snip each loop with kitchen scissors next to the knot and pull it away; on a bird, cut the string at the legs and neck and lift it off. Count the loops as they come off, check underneath for strays, and make sure every piece is gone before the meat is carved and served: the string is not edible.
Trussing and the clockHow trussing affects cooking time
Tying the legs tight against the body shelters the thighs, so they take longer to cook, while the trussed breast is plumper and cooks a little more slowly too. Leave a chicken untrussed, or spatchcock it, and more heat reaches the thighs, so they cook faster. That matters because the leg is the last part of a whole bird to be done: the Food Standards Agency says to check the thickest part, between the leg and the breast.
- Go by temperature, not the clock. Push a probe into the thickest part of the thigh, away from the bone: it should reach 70 °C for 2 minutes or 75 °C for 30 seconds, with clear juices and no pink meat.
- Stuffing adds time. Turkey cooking charts assume an unstuffed bird. The FSA advises cooking stuffing in a separate tin; if you do stuff a bird or joint, allow extra time and check the centre of the stuffing as well.
- If the breast dries before the legs are done, try a looser tie, the simple truss instead of the full one, or roasting the bird untrussed or spatchcocked.
Our roasting times chart has times for meat and poultry by weight.
Getting it rightTips and common mistakes
- Snug, not strangledString pulled too hard bites deep into the meat and spoils the shape. Tighten until the meat holds its shape and the string just presses in.
- Keep the gaps evenTies at uneven gaps leave bulges and thin waists that cook at different rates. Aim for 2–3 cm every time.
- Seam and knots in the right placeSeam underneath, knots in a line along the top: easy to find, easy to snip.
- Tuck those wing tipsWing tips left sticking out catch the heat and scorch before the bird is cooked.
- Cotton onlyHardware-shop string may be synthetic or dyed. If it does not say 100% cotton or kitchen string, leave it in the shed.
- Stuff the joint, not the turkeyCook turkey stuffing in its own tin, as the FSA advises; tie the bird for shape.
- Wash up afterRaw poultry and meat can spread bacteria: wash your hands and clean the board, scissors and worktop after tying.
- Practise firstA rolled-up tea towel makes a perfect stand-in joint for learning the butcher’s knot and the continuous loop.
Sources for this guide (10)
- Food Standards Agency: Cooking your food (rolled joints, poultry and pork cooked all the way through; 70 °C for 2 minutes and other time and temperature combinations; thickest part of a bird)
- Food Standards Agency: Christmas food hygiene (cook stuffing in a separate tin; a stuffed turkey takes longer; cooking guidelines assume an unstuffed bird)
- Serious Eats: How to tie a butcher’s knot (slip knot, 100% cotton twine, ties about every inch)
- BBC Food: How to tie a butcher’s knot (lengths long enough to go round the joint twice, ties about 3 cm apart)
- BBC Good Food: How to tie meat (separate ties, and continuous methods tied off where you started)
- Taste of Home: What is butcher’s twine? (cotton or linen; synthetic twine is not oven-safe; jute burns easily)
- Serious Eats: Spatchcocked roast chicken (trussing plumps the breast; the thighs are insulated and slow to cook in a whole bird)
- Food & Wine: The best way to roast a chicken, according to our tests (trussing shields the thighs; untrussed thighs cook faster)
- Saveur: Trussing a turkey or chicken (the French needle method: through the thighs, then the wings and neck skin, tied off)
- The Spruce Eats: What is butcher’s twine? (tying keeps a roast compact and stops it curling as it cooks; twine is inedible, remove it before serving)
Written 2 November 2026. Facts checked against the sources above on 2 November 2026. Drawings by Cookeryonline.